|
|
Deutsche Version |
| Home | |
| News | |
| Workshops | |
| Gallery | |
| Patterns | |
| Free Patterns | |
| Tips and Tricks |
|
| Links | |
| Contact About |
Tips and Tricks
Paper Piecing:
Connecting multiple segments (20.02.2015)
If a pattern is very detailed it is necessary to break it up into individual segments. These segments are pieced separately and are then joined together to a subunit.
Subunits are joined either to a separate single segment or to another subunit.
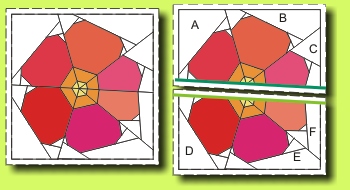
This primrose serves as an example:

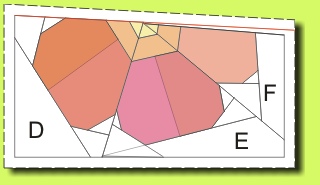
Segments A, B, and C make up one half of the blossom; segments D, E, and F form the other half. It all looks nice and straight on paper - but often looks very different in reality. The seam line between the two subunits (green line in drawing) is probably not straight, but has a kink in it.

This is the area where the next sewing line deviates from the straight line.
It is now necessary to draw a new sewing line using a ruler and a pencil (see red line).The new sewing line needs to stay as closely to the original line. Orient your new line either on the predominantly straight line or choose an average between both.
Take special care when you pin segments or subunits together. Properly pin the seam(s) of one segment or subunit to the matching seam(s) on the corresponding segment or subunit. Seams need to be aligned correctly.
In general it is not a problem if you deviate on the outside edge of your pattern, as long as you leave a wider seam allowance. Check out: ![]() Preventing the Shrinking Block.
Preventing the Shrinking Block.
For advanced paper-piecer
Working with a very complex and detailed pattern sometimes requires joining many segments or multiple subunits. A little trick might be helpful. It is advisable to keep a generous seam allowance along the outside of each subunit. This is similar to my tip: ![]() Preventing the Shrinking Block.
Preventing the Shrinking Block.

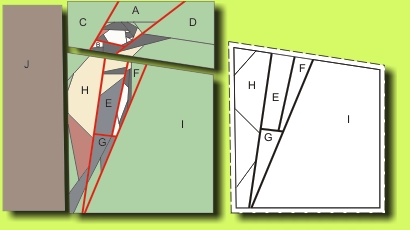
The wood pecker is only an example; he can be pieced without the described trick.
You need an additional paper-piece pattern for each subunit (subunit pattern). This additional pattern is created from the joined segment patterns but shows no seam allowances in between.1
For instance: the wood pecker's lower body consists of the segments E, F, G, H, and I. These 5 segment patterns were cut out, pasted together, and are now a subunit foundation; the outside lines of each segment are marked and a new seam allowance was added.
In addition it is sometimes very helpful to transfer some piecing lines of a segment to allow you to align your pieced segments easier (see segment H).
Now several possibilities are available. Experienced paper-piecers could trim the finished segments E-H, remove the paper, press each segment, and treat each segment as a single piece of fabric, sewing them to the newly created subunit foundation.
It is easier to first join the segments E, F, G, and H to create a subunit. Without reducing the outer seam allowances remove the paper and press this subunit. Align this subunit (called subunit #1) on the new foundation (additional subunit pattern) and baste in place by machine. Using the paper-piece technique, sew fabric piece 1 along the sewing line. Iron and baste this fabric to the foundation as well.
This whole unit is now firmer and can be joined considerably easier and more exactly to another segment or subunit.
1 How to create an additional subunit pattern: print a second copy of all segments; cut all segments out without the seam allowance and paste them onto a piece of paper. Transfer the main lines (outside lines of each segment). Then add a new seam allowance around your subunit.
Last update: 20.02.2015